Unreal Engine 4 has a character AI implemented out of the box. And I have already posted about simple behavior trees. But what about non-characters? Well, this is unknown territory. But good thing Epics left some hooks which you can use to turn things alive. This is a tutorial on how to implement a simple vehicle AI in UE4.
Setting up a project
I’ll try to make things as simple as possible, so let’s use the basic assets. We’ll use Advanced Vehicle C++ template as a starting point.
1. Setting up a player pawn
First, we’ll set up a player pawn. This is not mandatory. But I like having an RTS-like first player to see things from above. So, let’s create such a player. Add a new blueprint based on Pawn and define following event handlers:
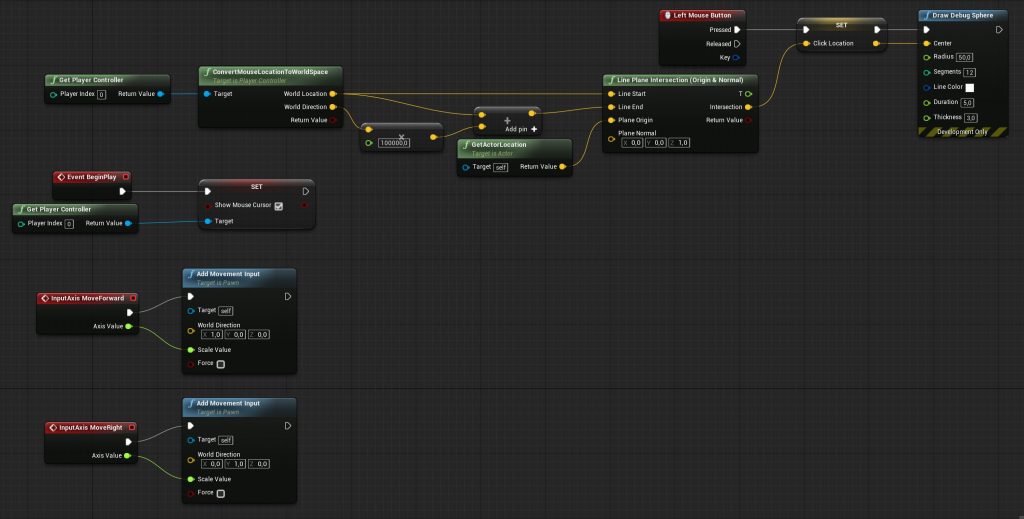
Add a spring arm and a camera. Set them up to your liking.


Add FloatingPawnMovement component, otherwise the player won’t move.
Then delete all PlayerStart actors from the default level and disable “AutoPossessPlayer” property on the vehicle.
Add the newly created actor to your scene and make it auto-possessed by the player. Now when you start a game you can navigate on a map in an RTS-like way (use WASD to control the view).
2. Setting up AI
Let’s move on to AI now.
First, we need an AIController:
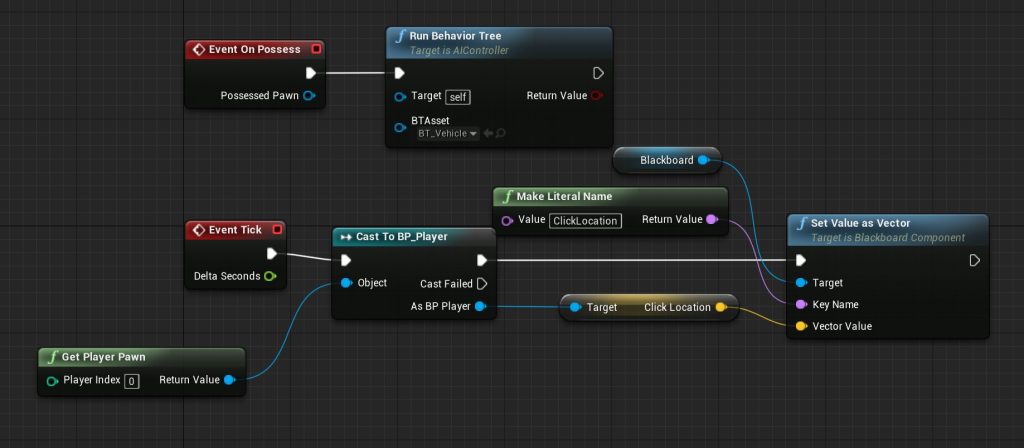
Then, we need a blackboard with only one variable of type Vector: “ClickLocation”. And a behavior tree, which is really simple:
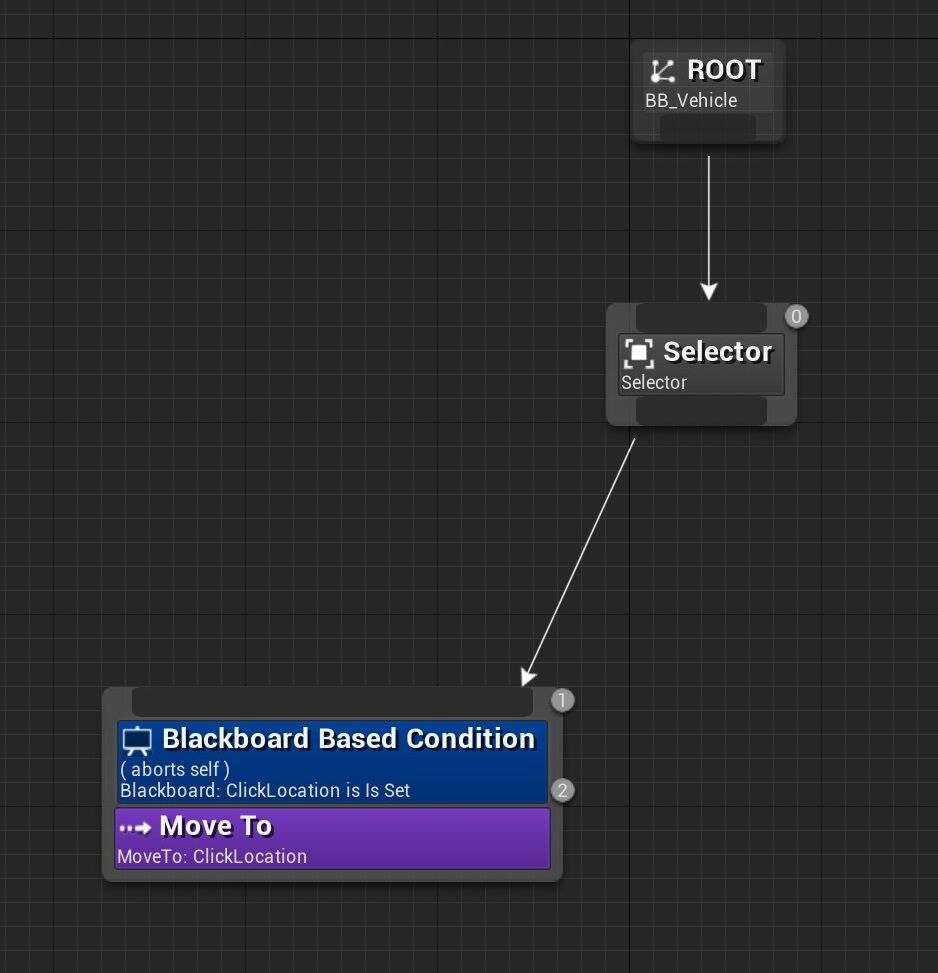
The only task is move to a ClickLocation set earlier in the AIController blueprint.
And one more thing: add a NavMeshBoundsVolume to the level, otherwise, PathFindingComponent won’t work.
As you noticed so far, I haven’t explained how things work. I think everything above is a bit trivial, so I don’t want to waste your time. But if some things are not clear, let me know in the comments.
If it was a character-based pawn, then it would already work. But it is a vehicle so things are a little bit more complicated.
Vehicle AI
Let’s see how MoveTo chain works in UE4.
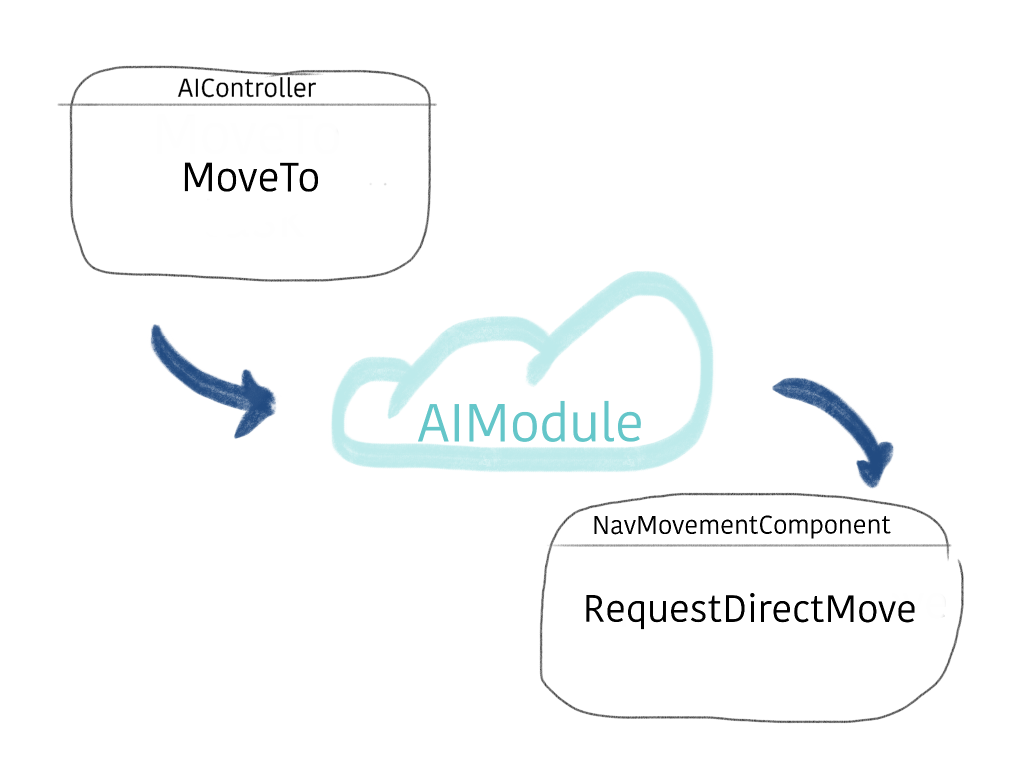
When a behavior tree runs MoveTo task it, in fact, runs AIController::MoveTo method. Then there is a lot of stuff going on in the guts of AIModule. But eventually, UNavMovementComponent::RequestDirectMove gets invoked.
UCharacterMovementComponet has this method implemented. That’s why it is so easy to set up an AI for characters. UWheeledMovementComponent, on the other hand, does not have a default implementation. So, it is up to developers to make a custom pawn move to a needed location.
The method itself has the following signature:
void RequestDirectMove(const FVector& MoveVelocity, bool bForceMaxSpeed)MoveVelocity parameter means the direction to a target. The length of the vector means how far the target is from the vehicle. In fact, if you multiply MoveVelocity by DeltaTimeSeconds you will get a distance between the vehicle location and target.
Usually a path between starting point and an end point consists of segments. When the vehicle is following a segment which is not final, bForceMaxSpeed is true. Basically, it is telling the vehicle: “Go as fast as you can, the target is still far from here”.
Let’s see how it works.
First, we need to create a new class based on UWheeledVehicleMovementComponent4W. Override its RequestDirectMove method like this:
Super::RequestDirectMove(MoveVelocity, bForceMaxSpeed);
FVector VehicleLocation = GetOwner()->GetActorLocation();
FVector Destination = VehicleLocation + MoveVelocity * GetWorld()->GetDeltaSeconds();
DrawDebugLine(GetWorld(), GetOwner()->GetActorLocation(), Destination, FColor::Red, false, 1.f, 0, 3.f);
Don’t forget to inject this class into the vehicle class. Change your vehicle class constructor’s signature in the following way:
// declaration:
AVehicleAIPawn(const FObjectInitializer& ObjectInitializer);

// definition:
AVehicleAIPawn::AVehicleAIPawn(const FObjectInitializer& ObjectInitializer) : Super(ObjectInitializer.SetDefaultSubobjectClass<UAIVehicleMovement>(AWheeledVehicle::VehicleMovementComponentName))
If everything is set up correctly in the project, you’ll get a red line drawn from the vehicle to its target.
PID Controller
At this point, we are almost done. Instructions are clear. Now you just need to implement an algorithm 😉
There are a lot of ways how you can achieve that. I used a PID controller. It is perfectly described in this amazing book here: http://www.gameaipro.com/GameAIPro/GameAIPro_Chapter40_Racing_Vehicle_Control_Systems_using_PID_Controllers.pdf
I don’t really want to explain how PID controllers work. There is a lot of math involved. And some things are beyond my understanding. I’ll just share my implementation, so you can look at it yourself. And I highly suggest reading that article from GameAIPro – it will help you understand how to tune your PID controller if you decide to use it.
https://gist.github.com/yateam/7ce5f43515978f7f172b53801205296d – this is my implementation.
And this is how it looks in action:
Thank you thank you thank you!!
Now I just have to understand some of the math and start fine-tuning!
I had some issues that could be worth mentioning:
I use UE 4.25 and there is a bug there that almost had me going insane, it was cleared out by the course you recommended by Ben. Love the course so far! Some issues with define in the c_cpp_properties.json file, seem to be a bug in 4.25.
Another thing that became an issue for me was VEHICLEAI_API, from my understanding VEHICLEAI is your project right?
I also wonder about line 72 in your .cpp file, float SteeringInput = SteeringController.CalcNewInput(SteeringError, SteeringPosition);
I had to remove the float definition from that line,
SteeringInput = SteeringController.CalcNewInput(SteeringError, SteeringPosition);
Since the SteeringInput was defined in Engine\Plugins\Runtime\PhysXVehicles\Source\PhysXVehicles\Public\WheeledVehicleMovementComponent.h
Am I doing something wrong?
Yet again thank you for your fantastic page, you have a new fan!
Best Regards,
Jonas
Hello ! : ) Thanks for this post. I’ve been trying to recreate the solution using the implementation from the gist, but I get a compilation error I’m not sure how to handle. For this line:
float SteeringInput = SteeringController.CalcNewInput(SteeringError, SteeringPosition);
it says C4458 – “declaration of ‘SteeringInput’ hides class member”
I have tried both renaming the float to something unique, as well as just removing the type declaration so it means UWheeledVehicleMovementComponent::SteeringInput.
I will try to dive deeper into the code, but do you have any idea what could be the issue. The debug trace shows that the destination is corretly identified, but the car does not respond. Only when clicking behind the car, it turns around, but then stops again.
Thank you a million in advance ! ; )
Hi, great article thanks a lot! What are the P, I and D values you’ve found to be acceptable. Can you share your P,I,D values too please?
Hey great post thank you. What are the P, I, D values you use can you share it too please?
Thank you! Oh, I am sorry, I deleted that project a long time ago. My suggestion is to start from the values from that article in AIPro page and fine tune them to find yours.
Would this example work with Chaos Vehicles, with just a few tweaks to AIVehicleMovement to use UChaosWheeledVehicleMovementComponent instead of UWheeledVehicleMovementComponent4W?
I have it currently running where the wheels are turning on the pawn, but actual movement is being done otherwise.
How different would AIVehicleMovement would if this were converted to using Chaos Vehicles?
I haven’t checked Chaos engine yet. But I think they did not change the AI part, so yes.
Would you be able to provide a quick test project demonstrating this?
What’s the point in making a post if you don’t give all info required to successfully run the demo?
This was not an intention. What I wanted – is to give a reader a rough idea of how to implement a vehicle AI:
1. Implement `RequestDirectMove` method in WheeledVehicleMovementComponent
2. Use a PID controller to fine-tune a vehicle’s speed.
It seems that RequestDirectMove is not called very often. Would it be more appropriate to put the code of the PID controller in the TickComponent function?
Actually, RequestDirectMoved is called every frame. Please check the method chain:
UPathFollowingComponent::TickComponent -> UPathFollowingComponent::FollowPathSegment -> UNavMovementComponent::RequestDirectMove
Vehicle is rotating, but cant move
can you share the whole project? as other people mentioned, sometimes it rotates but dont moveto, and sometimes it draws right debugline but doesnt rotate and moveto at all..